PIXELHUE
Keying and Cut & Fill Functions
(a)
Keying and Cut & Fill Functions
(a)
1. What is Keying
1.1 Definition of Keying
Keying is one of the most common operations in image processing. It involves extracting the desired foreground from an image and
separating it from the background. After separation, the transparency of the background area of the image is 0, while the transparency of
the foreground area is 1. To ensure a smooth transition at the boundary between the foreground and background, the transparency in that
area is a value between 0 and 1, making it semi-transparent. The separated image can be overlaid with other images to create a new
image.
Based on the characteristics of the image material, keying is mainly divided into two processing methods: Luma Keying and Chroma
Keying.
1.2 Implementation Principle
Luma keying is generally used for images with significant brightness differences. It can utilize the Y component from the YUV color space,
the V component from the HSV color space, or the L component from the LAB color space to perform brightness segmentation of the
image, thereby identifying the regions of the foreground and background.
Chroma keying is generally used for images with significant color differences. It primarily separates the foreground and background areas
based on their color differences. To address issues with keying effects in more complex scenes, the concept of 3D keying has been
introduced based on chroma keying. Its principle is to map the color space into a three-dimensional spatial display model, where the
degree of color difference is measured by spatial distance. At the boundary between the foreground and background regions, the weight
of each component is determined based on the position of the colors in three-dimensional space, achieving optimal keying results.
1.3 Application Scenarios
1.Keying Subtitles
In some events like conferences and concerts, it is often necessary to overlay subtitles on the displayed images. Users can create a
subtitle layer with a black background and white or colorful text. By using luma keying, the black background can be removed, leaving only
the subtitle content. Overlaying the processed subtitle content with the displayed image achieves the effect of adding subtitles.
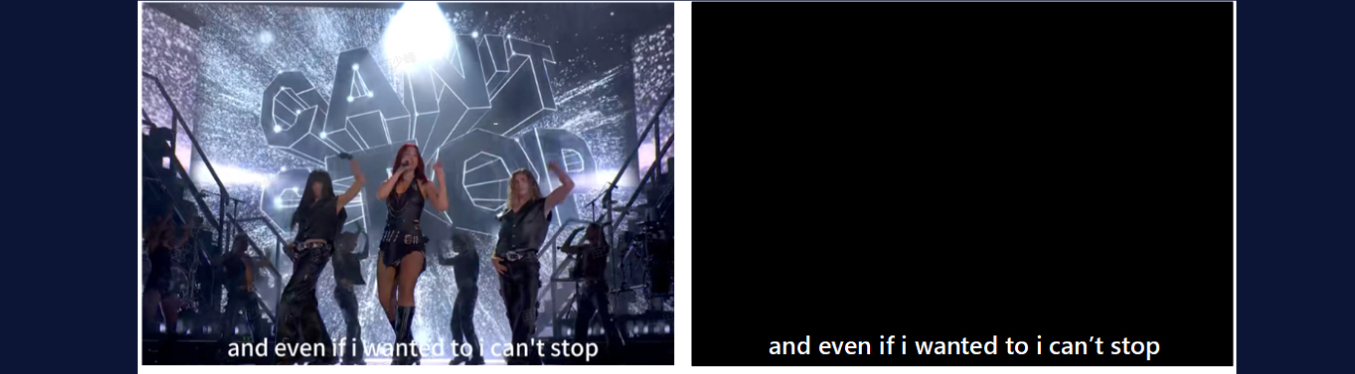
Figure 1.1 Example of subtitle keying scene
2.Keying Portraits
In activities such as live streaming, remote meetings, and virtual filming, it is often necessary to perform keying on portraits. Subjects are
filmed in front of green or blue screens. Chroma keying is then used to remove the background. This allows the subject to be placed
against a vibrant and dynamic backdrop, achieving the desired effect for the event.
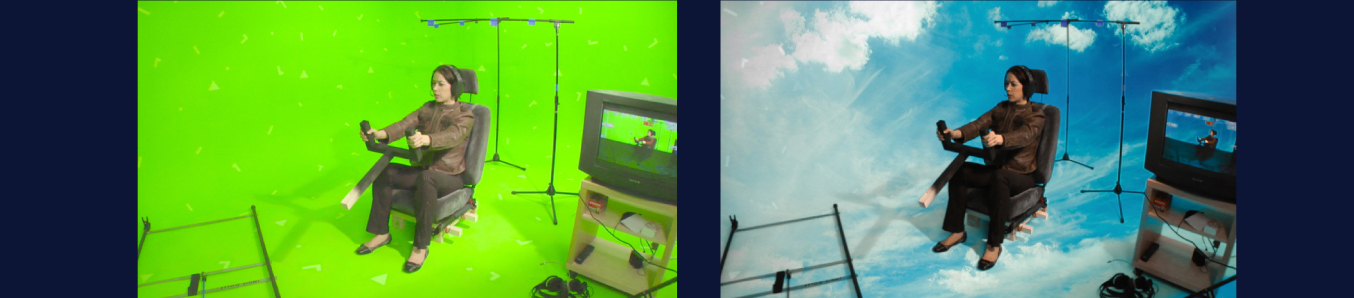
Figure 1.2 Example of portrait keying scene
2.PIXELHUE Keying Function Application
PIXELHUE supports smart keying, luma keying and chroma keying. Operators can choose the appropriate mode based on the specific
characteristics of the material to achieve the best keying results.
2.1 Smart Keying
2.1.1 Function Overview
Users can perform keying operations directly on images with black or colored backgrounds using the smart keying feature. In this mode,
the algorithm automatically selects the appropriate keying method based on the characteristics of the image, making the operation more
convenient. However, to achieve the optimal display effect, users need to manually fine-tune parameters using luma keying or chroma
keying.
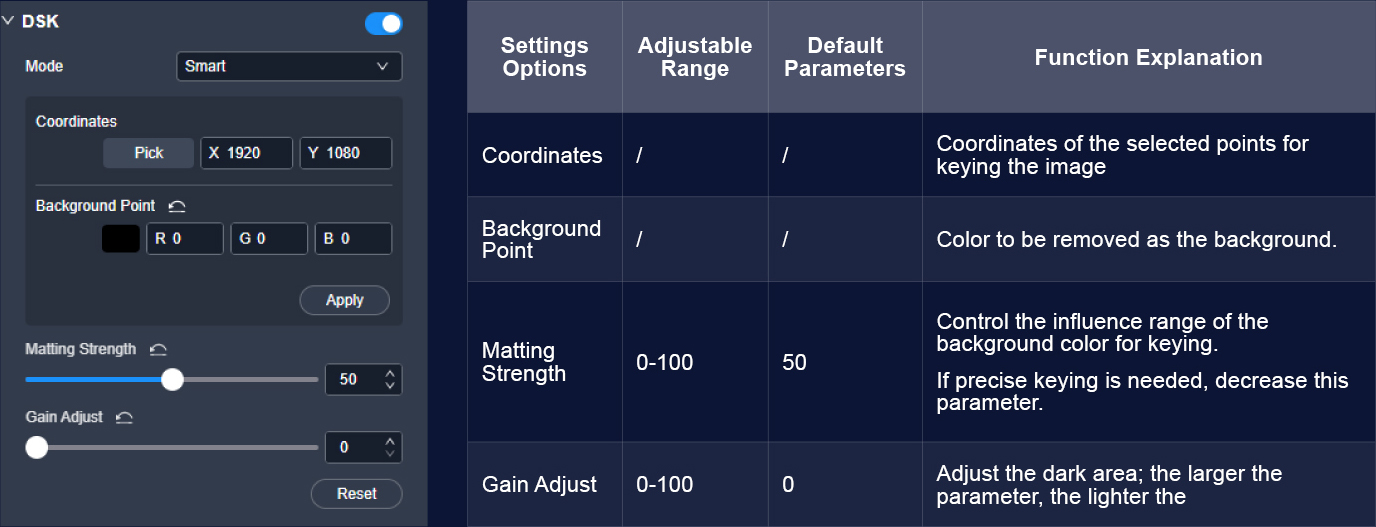
2.1.2 Software Interface
The interface of the smart keying software is shown below:
2.1.3 Operation Example
For the majority of keying application scenarios, parameter adjustments can be made based on the default settings by following these
steps.
1. Step 1: Load the image to be keyed and select the background color to be removed from the image.
2. Step 2: First, adjust the Matting Strength to modify the range of colors to be removed and refine the
foreground edges. Decrease the Matting strength to prevent non-background-related colors from
being affected, or increase it to remove the background color and related colors.
3. Step 3: After confirming the removal range, adjust the Gain Adjust to correct the dark areas, ensuring
a cleaner background removal.
The following examples illustrate the smart keying process in common scenarios, including Black Background with Red Text and Green
Screen Image Scene.
Case 1: Black Background with Red Text, Increasing Matting Strength
1. Step 1: Load the image with the black background and red text, as well as the background image.
Select the black color (0, 0, 0) to be removed from the image. It can be seen that under the default
parameters, the main text is keyed out, but there is a noticeable gray border around the edges of the
text.

2. Step 2: Increase the Matting Strength parameter to lighten the edge colors.

3. Step 3: After setting the Matting strength to 100, adjust the Gain Adjust parameter to remove the
border area.

Note: Gain Adjust reduces the gradient range; if the parameter is set too high, it may make the jagged edges more pronounced.
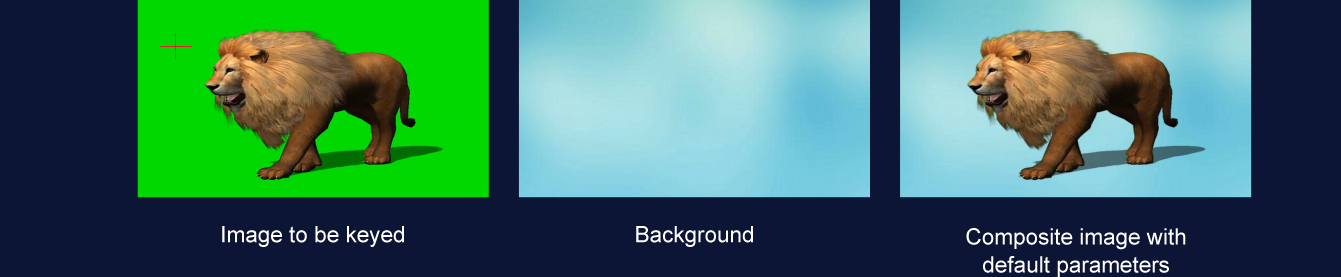
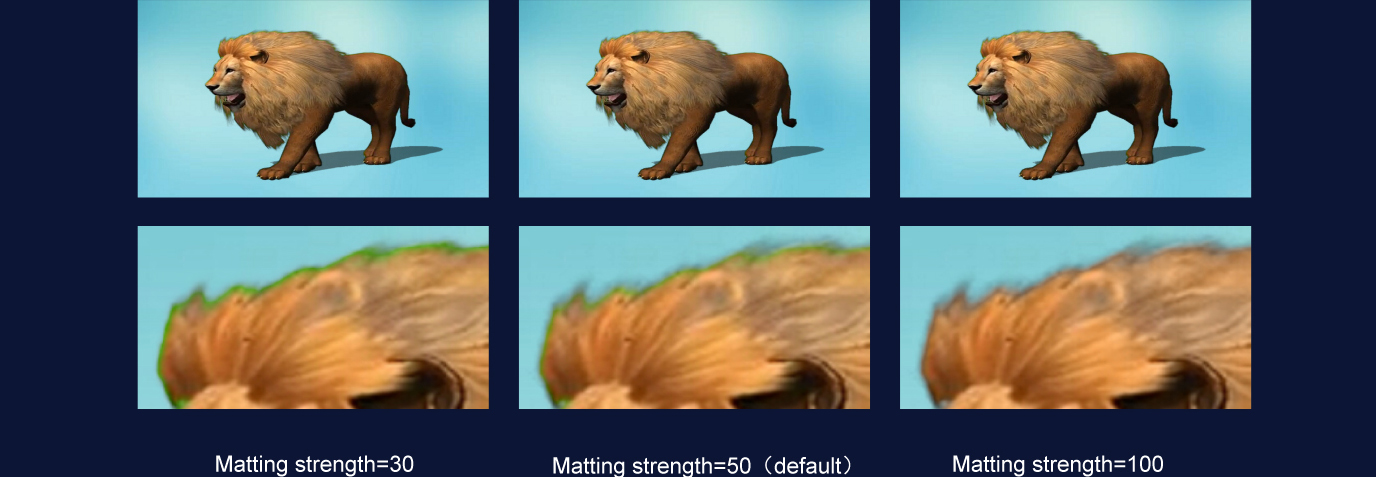
Case 2: Green Screen Image Scene, Natural Image
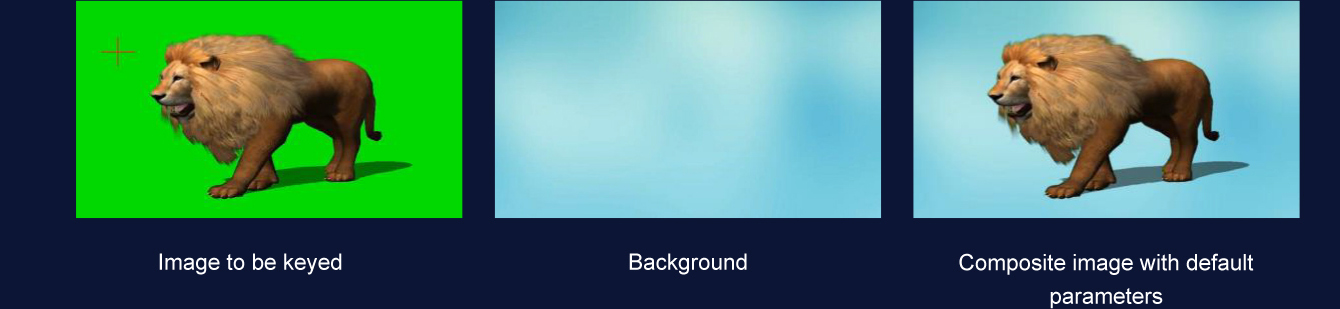
1. Step 1: Load the image with the green screen and the background image. Select the pixel at the
center of the crosshair, which has the color green (1, 216, 0), to be removed from the image. It can
be observed that under the default parameters, the main subject of the lion and the shadow are
keyed out, but there is green residue along the edges of the lion's fur.
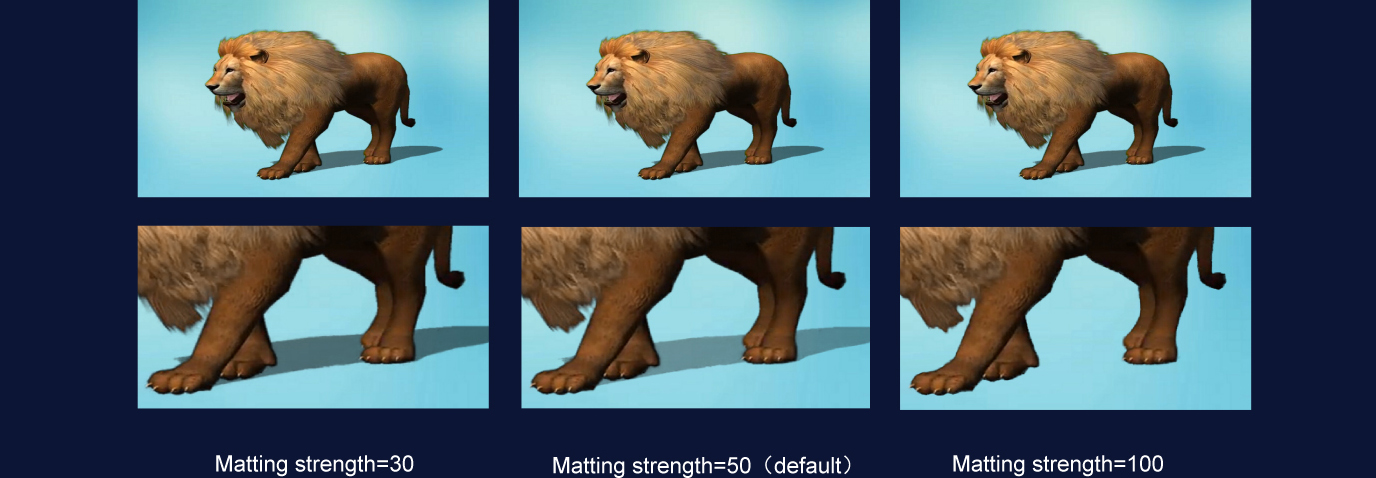
2. Step 2: Adjust the Matting Strength parameter. As the parameter increases, the green transition along
the edges of the lion's fur is removed.
3. Step 3: After setting the Matting strength to 100, continue to adjust the Gain Adjust parameter to
modify the shadow area. It can be seen that as the gain increases, the lion's shadow gradually fades.
The shadow disappears at a gain of 80. Therefore, the best effect is achieved with a gain of 0.
Note: Gain Adjust reduces the gradient range; if the parameter is set too high, it may make the jagged edges more
pronounced.
2.2 Luma Keying
2.2.1 Function Overview
Users can easily extract subtitles, shapes, objects, or other areas of interest from foreground images with
significant brightness differences, such as black-and-white images, using the luma keying feature. These extracted
elements can then be composited with other background images.
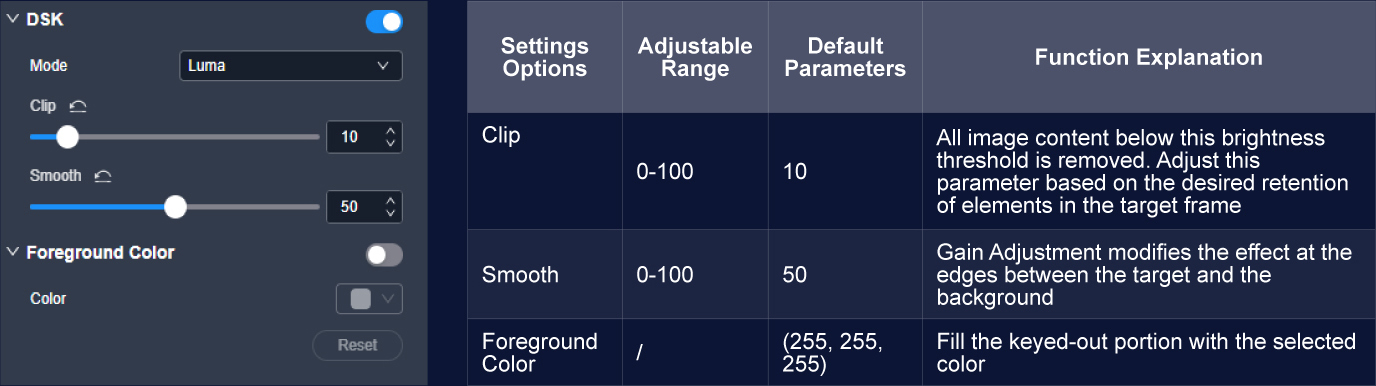
2.2.2 Software Interface
2.2.3 Operation Example
Luma keying is primarily applied to removing black backgrounds. For this application scenario, luma keying can be adjusted based on the
default parameters by following these steps:
1. Step 1: First, adjust the Clip to select the range for keying, ideally set it to just completely remove the
background to be keyed out.
2. Step 2: After confirming the removal range, adjust the Smooth to fine-tune the edge effect of the
removal.
3. Step 3: Finally, choose whether to enable Foreground Color based on your needs. If enabled, select
the desired new fill color.
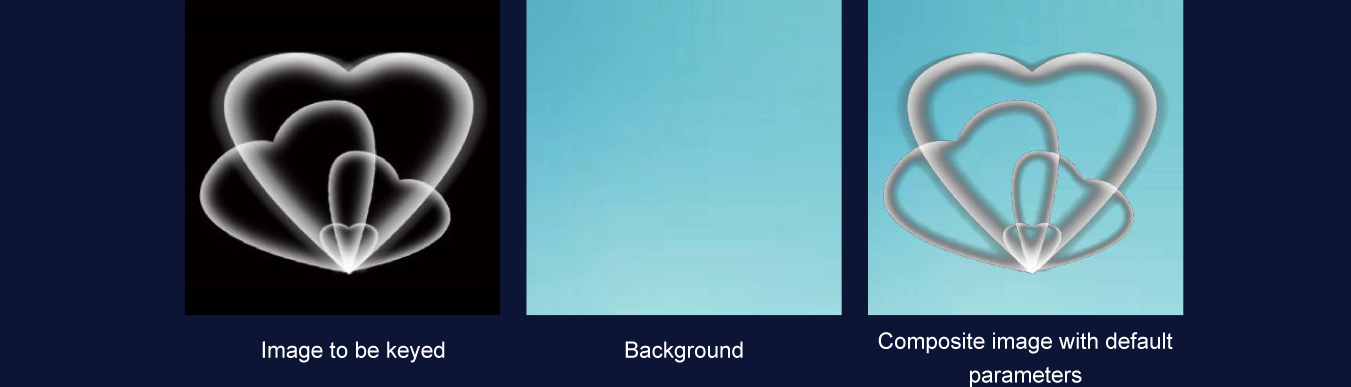
The following example demonstrates the luma keying operation using semi-transparent foreground material against a black background:
1. Step 1: Load the grayscale image to be keyed and the background image. The main subject is keyed
out, but the edges appear quite gray.
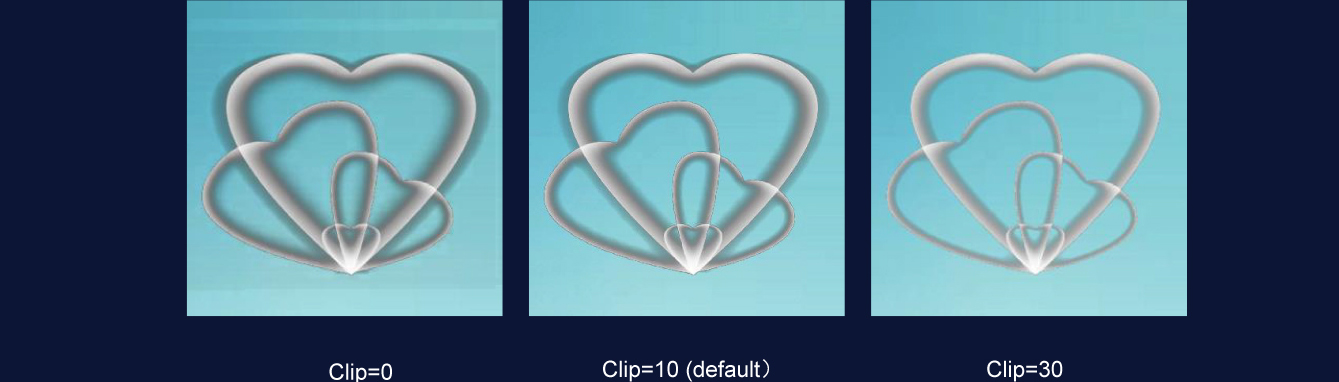
2. Step 2: Adjust the Clip parameter. Increasing the parameter removes the gray from the edges. At a
Clip of 10, the edges are relatively clear, and when set to 30, the transitional part of the edges has
been completely removed.
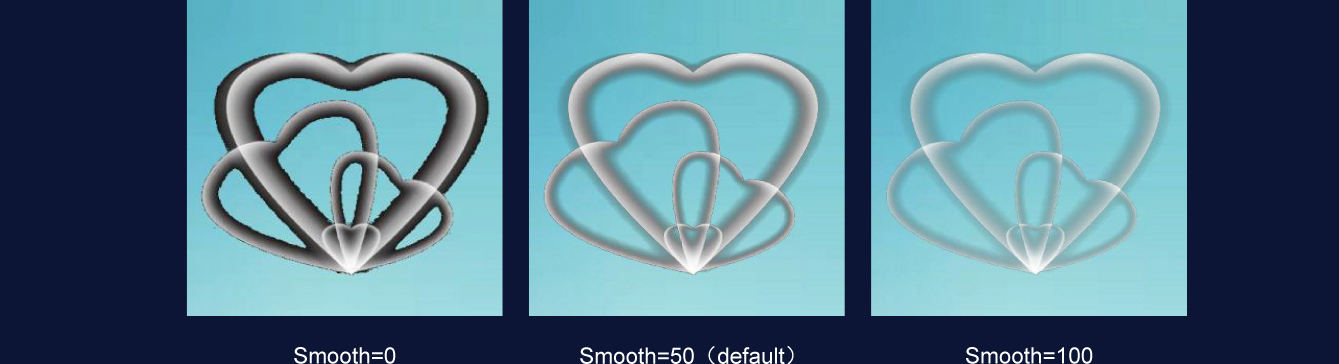
3. Step 3: With the Clip set to 10, adjust the Smooth parameter. Increasing this parameter creates a
smoother transition at the edges. When the Smooth is set to 100, the edge transition effect is optimal.
4. Step 4: Based on the Smooth of 100 from Step 3, turn off/on the Foreground Color according to the
creative intent and needs. As shown in the image below, when the foreground color is adjusted to
white, the image effect is improved.

Note: Luma keying is best suited for scenarios with a black background and a white foreground, in which case the softness can be
directly set to 100. If the scene involves a black background with elements like blue text on a black background, the softness may need
to be reduced accordingly.
2.3 Chroma Keying
2.3.1 Function Overview
Chroma keying separates the foreground from the background, preserving the contours and shapes of the foreground. This feature is
suitable for backgrounds that are predominantly colors other than black, gray, or white. The more vivid (or saturated) the background is,
and the greater the difference from the foreground, the better the keying effect will be.
2.3.2 Software Interface

2.3.3 Operation Example
For keying scenarios that require precise removal of colorful backgrounds, such as green screen keying, adjustments can be made based
on the default parameters by following these steps:
1. Step 1: If the non-removed colors in the foreground change, first adjust the Spill until the colors do
not change, usually setting it to the minimum.
2. Step 2: If the colors in the foreground are still affected, adjust the Hue Ramp until the colors do not
change, typically also set to the minimum.
Case 1: Green Screen Portrait Keying Scene
1. Step 1: Load the image to be keyed and the background image. Select the pixel at the center of the
crosshair, which has the color green (48, 238, 0). A certain proportion of the selected background
color and related colors are removed. Due to the reflection of the background color, there is a
noticeable color spill on the person's skin.

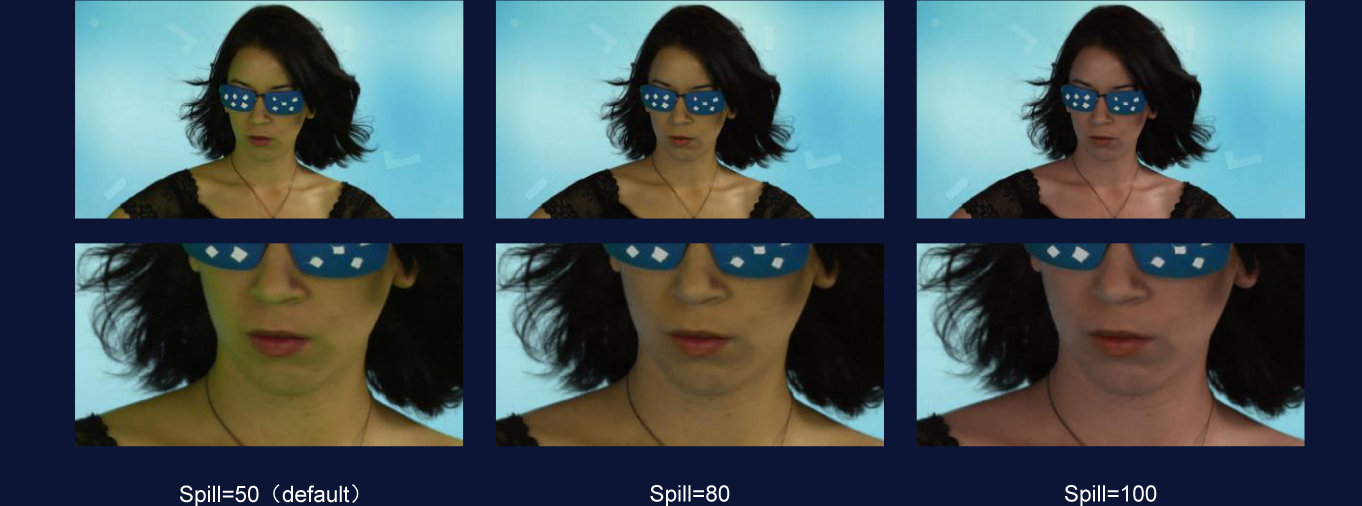
2. Step 2: Adjust the Spill parameter. As the parameter increases, the reflected colors on the person's
skin are processed. However, if the parameter is set too high, it can also affect the original skin tone.
Adjust as needed. As shown in the image below, when the Spill parameter is set to 80, it effectively
removes the green reflections on the person's skin, but when set to 100, it alters the person's original
skin color.
Case 1: Keying Scene with Shadows/Highlights
1. Step 1: To remove shadow or highlight areas in the foreground, first adjust the Saturation Gain for
coarse adjustment. Generally, set it to the point where the areas to be removed start to be affected.
2. Step 2: Then, based on the specific situation, adjust the Shadow Suppression or Highlight
Suppression for fine-tuning, until the areas are completely removed.
3. Changes to the Saturation Gain, Shadow, or Highlight Suppression parameters can significantly
impact the edges of the target foreground. Reducing softness and increasing suppression may result
in the loss of details, such as hair.
It is recommended to make adjustments in multiple steps. First, gradually adjust the Shadow or Highlight up to 100. If the desired effect is
still not achieved, you can reduce the Saturation Gain slightly, for example, by 25 each time. Then, reset the Shadow and Highlight to 0
and gradually adjust them again, repeating this cycle as needed.
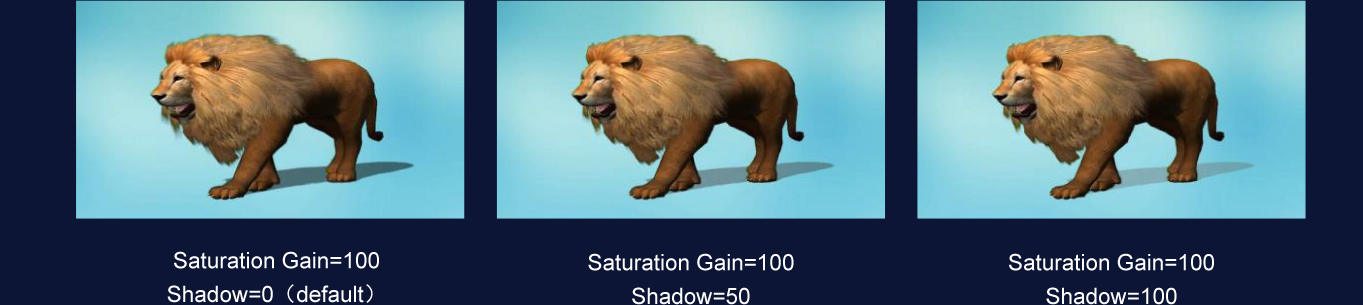
The following example uses a green screen lion image to illustrate the keying effect, focusing on the shadows and fur edges of the lion.
1. Step 1: Load the image to be keyed and the background image. Select the pixel at the center of the
crosshair, which has the color green (1, 216, 0). Under the default parameters, the main subject of the
lion and the shadow areas are keyed out. The darker green areas on the original image that are
deeper than the selected background are referred to as the shadow areas.
2. Step 2: Adjust the Shadow parameter. It can be observed that the shadow areas of the lion gradually
lighten, and the edges are also affected, but they are still not completely removed.
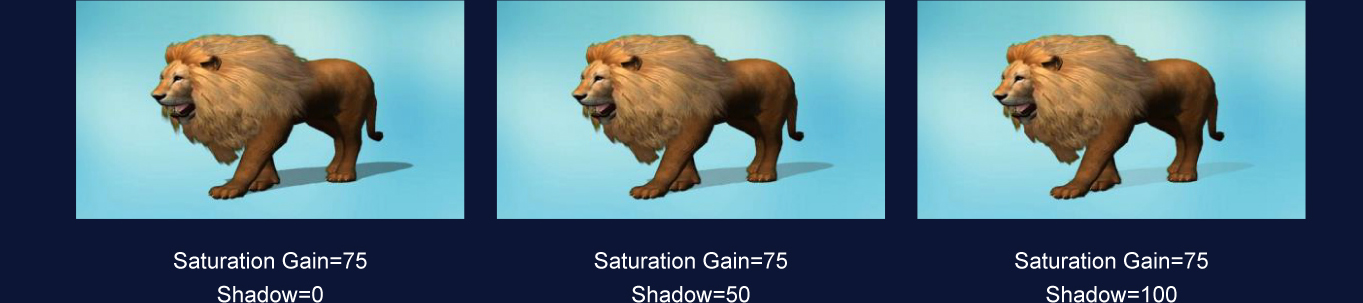
3. Step 3: After setting the Saturation Gain to 75, adjust the Shadow again.
4. Step 4: After setting the Saturation Gain to 50, adjust the Shadow again until the shadows are
completely removed.
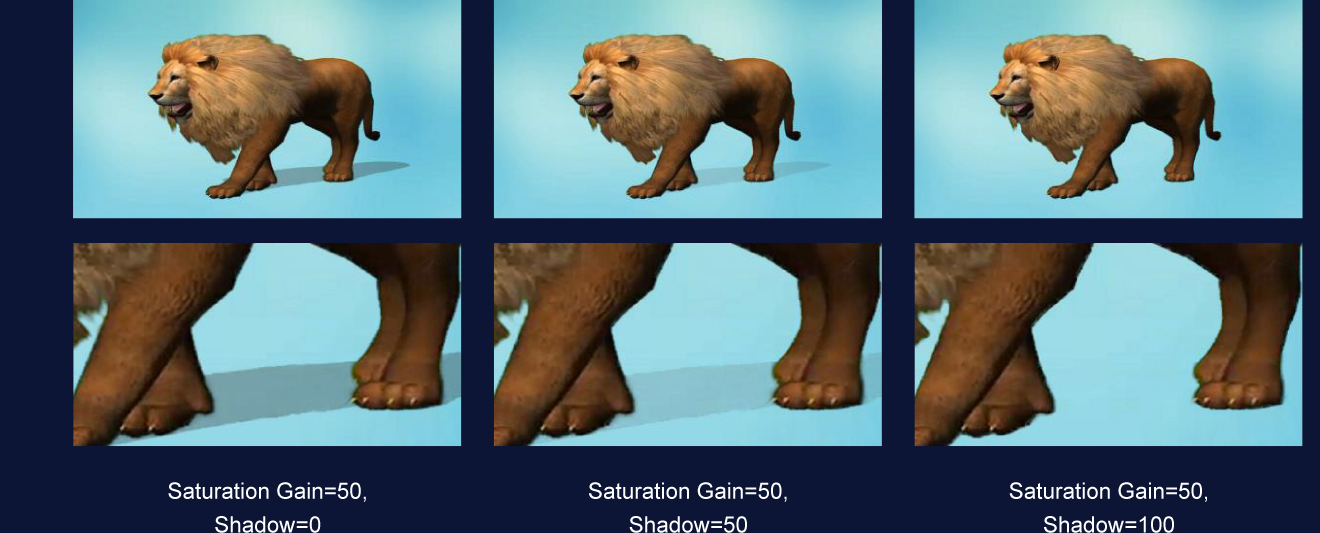
Note: When the Saturation Gain and Shadow settings are too low, edge details of the fur may be lost, resulting in a noticeable jagged
appearance.